Feb 2, 2023 4:40:50 PM
Easy protocol to develop your Supported Liquid Extraction method
By Bruce Kempf

Taking the time to develop a Supported Liquid Extraction (SLE) method using easy steps can save you hours or days of headaches down the road as well as giving you the peace of mind that you’re getting the best recoveries possible.
Many chemists are running SLE methods that they managed to slap together going with a sample pre-treatment and extraction solvent that either popped into their head or seemed logical at the time. Or, maybe the first thing they tried worked and they were happy to just run with it. But, how do you know it’s the best?
Well, I’m going to go over a quick and dirty procedure that will allow you to narrow down the best sample pre-treatment and extraction solvent that will provide the cleanest chromatography with the best recovery.
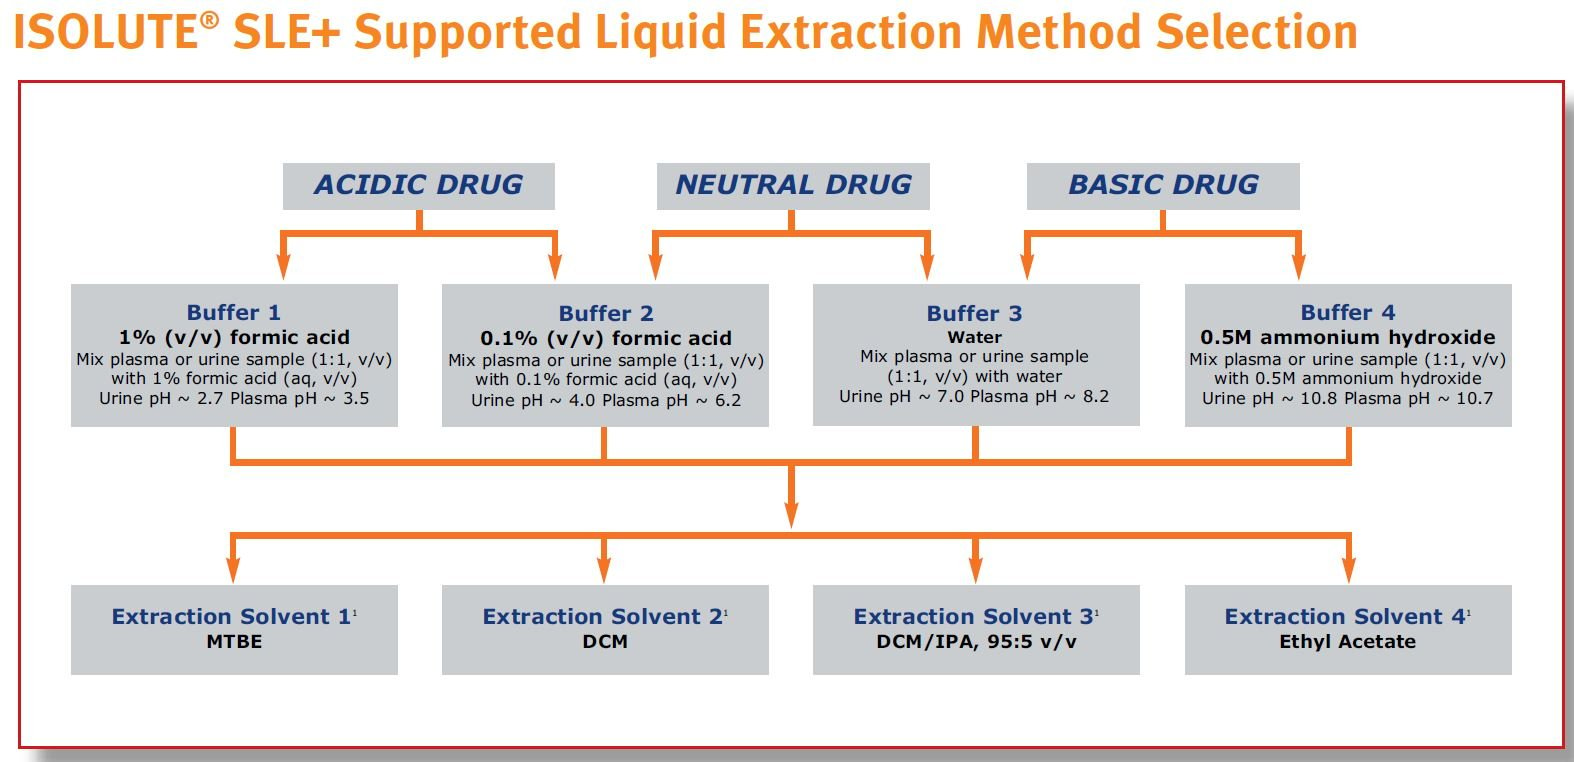
 Figure 1. Supported Liquid Extraction method selection: the 16-steps to find your SLE+ method.
Figure 1 above shows the 16-steps required to thoroughly scout out the best sample pre-treatment, as well as the best extraction solvent required for most applications.
When you’re doing a panel of more than one drug type and want to find the overall optimal conditions for a single method, this technique can be a wonderful tool.
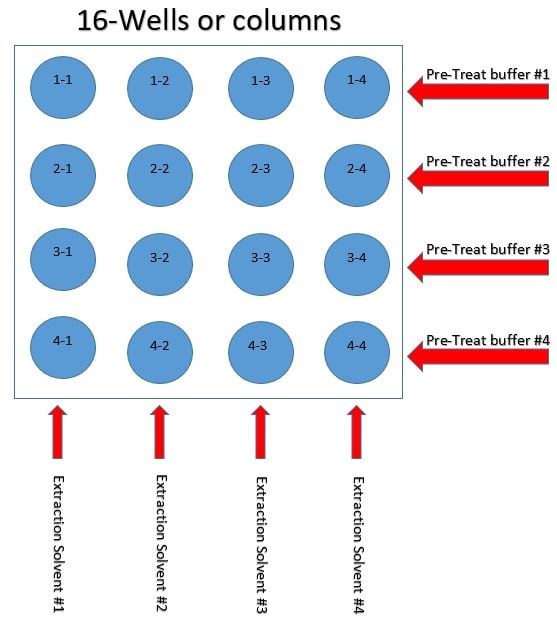
Basically, you are preparing four wells with each pre-treatment solution, and you are using four different extraction solvents on each of the pre-treated samples. This gives you a total of 16 samples which you can evaluate in parallel, which can save you a lot of time. You will then evaluate the recoveries by chromatography and or Mass Spec to find the one method that provides optimal results.
"It was something of a surprise that we were able to obtain clean samples with such a simple method," says Mitsuhiko Kawabata at Shin Nippon Biomedical Laboratories in Wakayama, who uses ISOLUTE® SLE+ to prepare biological samples for pharmacokinetic testing.
Make sure to not overload your plate or column. For example: If you have a Biotage ISOLUTE® SLE+ 400uL 96 well plate, you will want to make sure that the total volume of sample and pre-treatment buffer together does not exceed 400 µL. If possible, underload the plate with only 350ul. This will sometimes increase recovery.
The purpose of the sample pre-treatment is to promote partitioning of analytes into the organic phase, the charge on any acidic or basic groups should be suppressed wherever possible. This is particularly important for more polar analytes. Extraction efficiency can be optimized based on drug functionality by modification of the aqueous sample pH.
For acidic analytes, it is often preferential to acidify the sample with an appropriate acid prior to loading to ensure that the analyte charge is suppressed (non-ionized) and therefore more soluble in the organic phase. Conversely, for basic analytes, higher recoveries may be obtained by adding a small amount of basic modifier to raise the sample pH prior to loading.
Figure 2 below shows the layout for the 16 experiments. Each pre-treatment buffer is mixed 1:1(v/v) with your sample.

Figure 2. Experiment layout.
Step by step workflow for ISOLUTE® SLE+ columns and plates:
- 1. Pre-treat sample as required (including internal standard addition)
- 2. Ensure appropriate collection vessel is in place
- 3. Load sample onto ISOLUTE SLE+ column or plate
- 4. Apply vacuum (- 0.2 bar) or pressure (3 PSI) for 2-5 seconds to initiate loading
- 5. Wait 5-minutes for sample to completely absorb and form extraction layer
- 6. Apply water immiscible extraction solvent and allow to flow for 5 minutes under gravity
- 7. Apply vacuum (-0.2 bar) or pressure (10 PSI) for 10-30 seconds to complete elution
- 8. Evaporate eluent to dryness and reconstitute as required
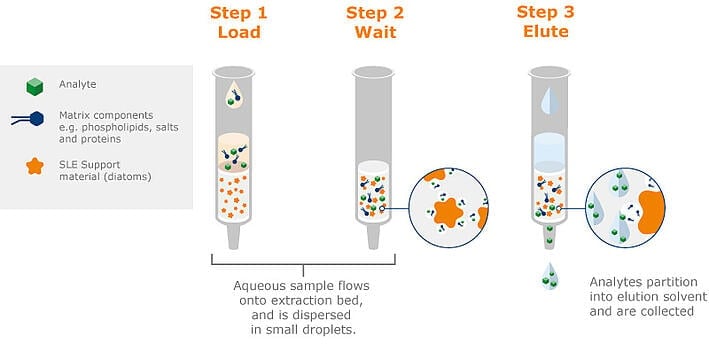
 Figure 3. Supported Liquid Extraction mechanism.
If you are interested in learning more about SLE method, please visit the blog site.
Published: Feb 2, 2023 4:40:50 PM

